Showing posts with label cottage. Show all posts

Sunday, March 16, 2014

English Rock Cakes with Orange Drizzle

I have friends who cook and bake all the time, not me, I cook enough for my family! But when I do cook or bake, I always turn to old favorites. My 'go to' recipes that I can rely on to always turn out well. I like recipes that are quick, easy and inexpensive to make. Rock cakes are a good standby of mine, a favorite of my children and great to take anywhere.
 
This morning I decided to try something different with the recipe. I added fresh orange juice, and that one additional ingredient lifted my 'old' recipe into something new. I am so happy to share this with you all!
 
 
ROCK CAKES

2 cups self rising flour
3oz butter - softened
1/2 cup sugar
1/2 cup raisins
1 cup freshly squeezed orange juice
Orange zest - about 2 teaspoons
1 egg - well beaten

Pre-heat the oven to 400F/Gas 6, and line a baking sheet with parchment paper (this saves a lot of washing up!)

Put the raisins into a small bowl, cover with the orange juice and leave them to soak.

Place the flour into a bowl and rub in the softened butter until you have a  mixture that resembles fine breadcrumbs. Add in the sugar and the orange zest. Drain the raisins and add them into the bowl, mixing until the fruit is coated with the flour. Beat the egg and add 3 tablespoons of orange juice. Add the egg mixture to the bowl and mix to a soft dough. Spoon small heaps onto the baking tray and transfer to the oven for about 12-15 minutes until the tops are a light, golden brown.
 
DRIZZLE
 
Mix together confectioner's sugar and orange juice until well blended and a nice runny consistency, not too thin, and not too thick!! Drizzle over the cooled rock cakes.


Enjoy, with a cuppa of course!
 
Wendy


Saturday, March 15, 2014

Wallpaper


I haven't blogged for a few weeks, there's this thing called 'employment' that continues to intrude into my social life. But the past few days have found me itching to get back onto the blog again. And today you may be surprised by what I am about to say!
 
I really like wallpaper!
 
Not everyone will agree with me, and lately there has been a greater interest in using paint and paint effects to decorate walls, but wallpaper really does have its place. If you are considering creating a cozy, country haven for yourself, somewhere to relax and rest. Somewhere you can curl up with a good book (and a cuppa of course) then you can't go far wrong than to start out with some of the beautiful papers that are available now.
Contemporary florals and leaf trails in the palest of colors, create a country cottage look no matter where you put them.  Because of their light background they also keep a fresh feel to the room, perfect with white furnishings.
 
Imagine this soft red paper on one wall of your dining room, even a smaller room can take a darker color. Ask me how I know! Your dining room will be warm and inviting, glasses and china will glow softly in the evening light. Your guests will want to linger over their meal, enjoying both the conversation and the warm, cozy room you have created.
If you aren't too sure about committing to wallpaper, if you are worried about making that leap, how about adding some to the back of your book cases  to add a modern, and colorful accent to your room? Or cover a large canvas with a striking paper and hang it over your sofa as a piece of art.
 
Anaglypta papers are a great way to add texture and pattern to your room, without having to embrace a large or busy pattern. Left unpainted, they are light and clean, but painted with your favorite colors, they add definition and are perfect for hiding imperfections on older walls!
  
 There are so many wonderful papers available now, suitable for both bathrooms and kitchens. Able to cope with steam and mess they look attractive and add warmth, softness and atmosphere to rooms that can be cold and hard. And believe me, these are not your mom's papers!
 
Don't think that paint, or plain walls are your only option in your home. Wallpaper is beautiful, functional, easy to put up - ask me how I know - and lasts for a long time. Ask the Victorians, the Chinese (who started it all) and visit any historic home in Britain and you will see wallpaper in every room!


 Wendy


Wednesday, March 12, 2014

This Hue for You? Radiant Orchid

CaptivatingEnigmatic, Expressive, Confident 

Radiant Orchid is Pantone's color selection of 2014! 


For over 50 years, the Pantone Colour Institute has chosen the color of the year that has had the most influence on everything from graphic design, fashion and interior design all over the world.  Influences may also stem from technology, art, popular travel destinations and even sporting events that capture worldwide attention.
 
While the 2013 color of the year, Emerald Green, served as a symbol of growth, renewal and prosperity, 2014's Radiant Orchid imbues creativity, originality and bold expression.  I love how Pantone's Executive Director, Leatrice Eiseman, describes this color. 
 
"An enchanting harmony of fuchsia, purple and pink undertones, Radiant Orchid inspires confidence and emanates great joy, love and health. It is a captivating purple, one that draws you in with its beguiling charm."
 
Though deep purple tones are traditionally a bit bold for me, I am intrigued by the pinkish-purple of Radiant Orchid, as its feeling resonates with my recent inspirations.  This last year my friends have inspired me most.  They've been daring and confident in their decision making; they are taking control of their lives and showing the world who they are! 
 
Embolden yourself with a little or a lot of Radiant Orchid, 2014's Pantone Color of the Year!  Have an existing color palette you love? Liven it up with this hue.  It's uplifting and bold without being overpowering.
 
For toned-down boldness, go all-over with multi-hued purples and pinks.  A saturated look like this, creates a vibrancy without being flashy.  
 
  
Or, for a more wistful, romantic appeal, mix medium purple hues with its softer pastel cousins.
  
   
A dark purple accent wall in a bedroom filled with soft textures courageously balances energy and tranquility. 
  
 
Exude your ultimate confidence by adding a standout piece in this bright hue against a backdrop of white! 
 
 
Add a stimulating yellow to a pinkish-purple for a combination I am loving right now!  Yellow relates very well with purple.  It's an optimistic color that also awakens confidence and perception, much like purple.  Try these on for size!


Boho style
 
Another wallpaper, Wendy...
  
Whether or not you put much stock in trends, color does set a mood that can change the way you feel about yourself and your environment.  So ask yourself what in your world is inspiring you these days.  Does your home embody those things? 
 
May color inspire you and reflect you.   
 
Erin 

Friday, March 7, 2014

Queso Chicken

This is the ULTIMATE comfort food recipe. Have you ever combined two really great things to make an even greater thing? Chicken fried chicken and a really good queso blanco, two staples from my childhood in Texas begging to be united. 

Look close, closer, do you see its gooey cheesy goodness covering all that awesome chicken crispiness? It's as delicious as it looks and simple to make, in fact, you may already have the ingredients at home.

This recipe makes a slightly larger then necessary batch of queso so that you can have it as a side for tortilla chips, or vegetables. 

April

Queso Chicken
 
Ingredients for the chicken:
  • 1 cup all-purpose flour
  • 1 tsp seasoned salt 
  • 4 boneless skinless chicken breast halves
  • 1 cup of milk
  • 1/4 cup Canola oil
 Ingredients for the Queso Blanco:

  • 1 cup Monterey Jack cheese 
  • 1/4 cup salsa
  • 1/4 cup half-and-half
  • 1/2 tsp minced garlic
  •  1/2 teaspoon salt
Directions:
Heat oil in a large skillet over medium heat. In one bowl, combine flour and seasoned salt. Pour milk into another bowl. Using tongs, dip chicken breasts first in milk, then in flour coating both sides of the chicken breast, shake off excess flour. Add the chicken to the skillet. Repeat with each breast, being careful not to crowd the pan.

Cook chicken breasts for approximately 10 minutes on each side or until chicken is no longer pink in the center and juices run clear.  Once done, drain breasts on a plate covered with paper towels. 


Put all queso ingredients into a double boiler and turn heat to medium. Cook until melted and well blended, stirring with a wooden spoon. 


Place chicken on individual plates and smother with queso.

Tile My World, Softly

Once there was a small boy and a bottle of red nail polish......

You know where I'm going here!!  I've never before cried over spilled milk like this.  I had just installed an expensive floor-to-floor carpet in my bedroom.  Just days later, my two year old was playing in my bathroom cabinet while I was doing my makeup.  He pulled out my red nail polish and with the care and diligence of a two year old, proceeded to drop it on the tile floor.  Of course, it shattered and sprayed red polish onto my new (and did I say "expensive") carpet.  I really did cry.... like a baby!  I'm a bit ashamed to admit that, but I guess I just did.  Unfortunately, there was no fix, and I had to replace the whole thing!

This is one of the inherent problems with traditional wall-to-wall laid carpet.  I have a solution to offer for those who love the comfort of carpet, but dislike the installment and care requirements, not to mention the lack of variety and intrigue traditional carpet has to offer.

This is a product that gets me excited every time I talk about it!  I've been using them in my own home for six years.

Carpet tiles have come a long way, Baby! 

 
Every texture, every color, every style can be found in a versatile, interchangeable carpet tile fit for a dressed up barn to a queen's palace.
 
The glory of carpet tiles is in their versatility and ease of assembly and care.  You can place them in any room in any format and size to achieve a truly one-of-a-kind, designed by you, flooring that will enhance your décor in just the right way.  They can be placed on any floor surface.  In fact, I even cut some to fit my stair treads.  Anything you can think of, you can do it with carpet tiles.
 
The only company I know that makes carpet tiles specifically for the home is Flor.  Its website (www.flor.com) is chock full of room galleries for design inspiration.  For the ultra creative types, the website boasts a FlorBuilder tool to create just what you imagine (or what you didn't!).  Many a night I have been found fiddling with the tool for an hour or more just to see what I could concoct.  Professional design assistance via phone and online is available, and storefronts exist throughout the country.
 
Did I say how easy they are to clean?!?  You can pop out a single tile, clean it and put back in place.  If too far damaged, you can simply replace the damaged tiles with new ones (hint:  Always order extra tiles).
 
My bedroom floor is now covered, wall-to-wall, in these tiles.  In other rooms I have utilized them as rugs and even stair treads.
 
Flor has created lovely vintage inspired carpet lines, like those shown here plus much more on the website.  Longer piled carpets are also available.  You can place the tiles on any flat surface.  They do not adhere to the floor, but simply to each other to stay in place.

All Flor products are made of varying degrees of renewable and recyclable material. 
 
FYI, Flor is offering 25% off your order through March 14. 
Samples can be ordered online at low cost, as well.
 
I'd love to know what you think of this product.  Check out their website at www.flor.com and write me back.


 Erin


Tuesday, March 4, 2014

Shabby Chic and Mid Century Modern

A Surprising and Delightful Trend in the Making!
 
As I indicated in my first post, I am a lover of all thing Mid Century Modern (MCM).  At first glance, it seems an odd pairing, Shabby Chic and MCM.  I shouldn’t have doubted it myself, as there must’ve been a reason that April and I had such an appreciation for each other’s sense of style.  Both draw greatly from the past US and European influences; both enjoy color, often on a backdrop of white.  Beyond that, these two are completely dissimilar.  Metaphorically, I think Shabby Chic is to MCM like peanut butter is to chocolate.  Their distinct differences provide a respectful and beautiful balance, not to mention a unique and withstanding partnership.  Don’t just take it from me.  This you may have to see to believe!
Let’s move in slowly.  The most obvious example of Shabby with MCM is in the kitchen.  Painted cupboards and pastel dishware work seamlessly with MCM appliances.   
 
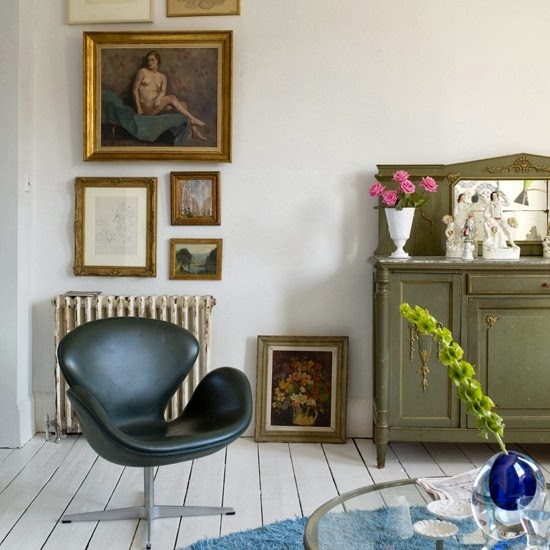
My personal favorite melding is below.  An Arne Jacobsen Swan chair and shag rug (blue, nonetheless) sitting atop white painted, wide planked wood flooring.  Not to be outdone by the sweetly adorned sideboard.

Eero Saarinen’s popular Tulip chairs and table certainly belong its Shabby surrounding.

Floral prints, like the wallpaper here, and ornate lighting is calmed by the straighter lines and edges of the sofa legs and Lucite coffee table.

The warmth of the MCM teak wood chair brings out the sense of quaintness provided by the wainscoting and painted sideboard. 
 
More wallpaper with whimsy makes complete sense with this retro leather chair!
Like MCM details in a Shabby Chic surrounding, much can be said for the opposite.  This is an example of a MCM home, complete with aluminum clad floor-to-ceiling windows and concrete floors keeping a clean, minimalist look, balanced by floral printed furniture covers and shaped table and chair legs. 
I hope I have convinced you that Shabby Chic’s floral, antique feel and Mid Century Modern’s urban and minimalistic feel pair quite well, in a peanut butter and chocolate kind of way.
No matter, combining interior styles can be intimidating, so I’m including some tips to making Shabby Chic and Mid Century Modern shine as a pair!
  • Use simple shelving to showcase your favorite Shabby Chic pieces.
  • Mix Shabby Chic floral fabrics in neutrals with MCM neutrals for a monochromatic, yet textured look.
  • Combine any Shabby Chic and MCM accessories.  The frilly elements of Shabby Chic work well with the more sculpted shapes of MCM.
  • Combine painted wood furniture pieces with natural look wood, metal or Lucite pieces.
  • Create a beautiful contrast with a rug in one style next to a furniture piece in the other style.
  • For walls, juxtapose Shabby Chic wall décor with MCM wallpaper, or vice-versa.
  • Or, simply add just one element of MCM to your Shabby décor, and see if you find they have a home together.
In writing this I’m realizing these styles have another commonality, rather important.  Pieces in both styles are readily found at thrift shops, so this is your opportunity (potentially inexpensively) to make this trend come to life for you!
Look forward to more posts from me combining Shabby Chic and Cottage styles with some modern elements.    
Erin


Monday, March 3, 2014

Erin Here, Hello!


I am grateful to have the privilege to introduce myself today as the third blogger of Shabby Pine Cottage and fortunate good friend of April and Wendy.  Although each of us plenty different, we have a distinct common tie.  What binds us, beyond enjoying a “cuppa” tea daily, is our passion for discovering what comforts us, keeps us, and just simply helps us get through the requirements of daily living (thus, the sanity breaks involving kettles of tea!).  
You will find me the complete and total lover of all things Mid-Century Modern (or  MCM).  It started with a little magazine called Domino (some of you may remember, though unfortunately no longer published).  Its contributors were genius at combining styles in a broadly appealing way.  Shortly after, I was enticed to make my first modern purchases, a set of Harry Bertoia wire chairs and a large hanging Noguchi lamp.  Pairing them with a round, wood Crate and Barrel dining table, I completed my first eclectic design schematic!  Every day thereafter, I loved sitting at that table, feeling so proud of myself.  
Harry Bertoia Wire Chair, Circa 1952
My excitement over MCM décor was further propelled by nostalgia.  My grandmother had many Heywood- Wakefield furniture pieces.  Many of you may be familiar with their beautiful champagne colored finish!  Now, they have been handed down to me (the only one in the family interested in this “old stuff”).  Every day I sit at my new/old dining table, thinking how cool it is that my dad sat at this table every day while growing up with his family.  As many of us do, I imagine past eras as more romantic and sweet than they may have actually been.  I picture my dad and his three sisters, along with my grandparents sitting nicely to a well-prepared dinner, each taking his turn to talk about his day with responding words of support and encouragement.   
My dad might laugh at that notion!  Truthfully, it was probably more like today.  My romanticization and reality parallels probably end with every evening sitting down for dinner together (we’ve managed to keep that tradition for now).  It’s more like kids squirming in their seats to a frantically prepared meal while doing their best to make the others laugh with inappropriate sounds and dinner talk.  I think that they think dinnertime is a forum to try out their performing arts skills (i.e. things they learned at school from friends that day)!  Either way, undoubtedly, these moments bond our family, much like they always have through time.
We all need those things in our lives that make us smile each day and help us remember all things good.  I hope you, too, have those things, whether new or old, big or small, physical or simply a memory.  I will share some of those things of mine, along with my lovely and funny compadres.  Please feel free to share with us, as well, or simply just read.   
Erin


Sunday, March 2, 2014

Going for Groceries


Early Sunday morning, and it's a freezing, frosty cold day! I thought you
may like to see some of the pictures I took on the way to the grocery store.

 
Everything is covered in thick white frost

I stopped to say hello!
 

The long and (not) so winding road!


And after being out in the cold, I am now sitting down with a cuppa and a biscuit (and for all my American friends - that would be a cookie.) So make a cuppa, come and join me!
 
Wendy


Thursday, February 27, 2014

Castle Howard


If you take the A64 heading west from the coast and inland towards York, your eye will be drawn to the sight of acres of lush green parkland, and in the distance you will see the rooftops of Castle Howard.*

One of the grandest private residences in Britain, Castle Howard was built between 1699 and 1712 for the 3rd Earl of Carlisle. It is not a true castle as this term is often used to describe English country houses that were built after the castle-building era of c.1500. Building work began in 1699 but completion of the house took over a hundred years. 
The Turquoise Drawing, refurbished in 2002 in a turquoise damask specially designed and woven for Castle Howard, is filled with portraits by notable artists such as Gainsborough and Joshua Reynolds.  


One of the two formal bedrooms on display to visitors, Lady Georgiana's bedroom and the lovely dressing room beside it, evoke the life and times of Lady Georgiana Howard. Lady Georgiana, the daughter of the 5th Duke and Duchess of Devonshire, married George Howard, later the 6th Earl of Carlisle, in 1801. In the 1830s these rooms were part of the Earl and Countess' private apartments.

The passage from Lady Georgiana's bedroom and dressing room leads to another dressing room and bedroom, this called simply The Castle Howard bedroom. Where Lady Georgiana's Bedroom is feminine in both furnishings, and feel, the Castle Howard bedroom is decidedly male. A deliciously ornate set of toiletries sits upon a sideboard, and the writing table is drawn up, as if the resident of this room was about to sit down and pen a missive. Queen Victoria is known to have slept in the bed that graces the dressing room, when she visited Castle Howard in 1850.
Ornamental water features are used to dramatic effect in the grounds and gardens at Castle Howard. It was the 3rd Earl who started work on creating the waterways which now dominate the landscape. The Walled Garden was laid out in the early 18th century as a kitchen garden. Today part of the garden is still given over to vegetables and cut flowers but the remainder of the area has been transformed into a garden of roses, dedicated to the memory of Lady Cecilia Howard.

Check out the links I have added below, and even if you cannot get to Yorkshire today, sit down with a cuppa, and read some more about wonderful Castle Howard!

Wendy


http://www.castlehoward.co.uk/

http://www.britainexpress.com/index.htm

Wednesday, February 26, 2014

Does it snow in Britain?


"January brings the snow
makes our feet and fingers glow"*
 

I am often asked if we get snow in the UK. It makes me smile.

April asked me the very same question on Monday, and I went to my desk to pull out my map of the world. (I love maps, but that's another post entirely!)
 
We looked at the location of the UK and at the latitude it is on. Did you know that London is at 51.5N while Quebec is at 52N? Glasgow in Scotland sits at 55.8N. Not quite as far north as Juneau in Alaska (52.9N) but it's a good way north.

The UK doesn't get the same bitterly cold weather as they do in Canada and Alaska, but we do get snow. And winters are long and dark and dreary. Once the clocks change, which happens in the UK about a week after the US, it doesn't get light in the mornings until around 8:30 - 9:00am. We go to work in the dark and we come home in the dark because the light starts to go around 3:00pm in the afternoon.

 
However, the summer is long and light. You can sit outside on a summer evening until 10:00pm and the birds are singing and the sun is coming through the window before 4:00am in the morning. And if you hanker for some time sitting in the sun on the island of Malta, just take yourself out to LA and sit on the beach there, the latitudes are so close you could imagine you're sitting in the Mediterranean! 


The photos on this page are of the last snow I 'enjoyed' before leaving the UK and moving to America!

All that talk of snow has made me feel cold, so I'm off to make a cuppa, you coming??

Wendy


*Sara Coleridge

Tuesday, February 25, 2014

"Nesting" Springtime Centerpiece


Hello friends! 

Yesterday morning, it had just hit me that Winter is ending and  I NEEDED wanted a large and dramatic Springtime centerpiece for my dining room table, but at a "this is an unplanned and compulsive buy" price.

I was pushing a shopping cart around my local craft store with my sweet friend Wendy in tow, roaming aisles, waiting for inspiration to bite. Five ideas later, it finally did! We came across a 14 inch super twiggy wreath, very inexpensive, and a birds nest came to mind. A LARGE birds nest. Go big or go home, right? 

Give it a try! ~ April


These are my supplies, cost around $10, items available at any craft store:


  • 1 - Natural wreath, the really "twiggy" variety, 14 inches $2.99

  •  1 - 6 inch greenStyrofoam Disc (located in the floral department) $1.95 *the 6 inch fit the center of my wreath perfectly, but I recommend holding up the wreath at the craft store and eyeballing the center of it against the foam.  You will want a tight fit, you can easily cut the foam,  shaving the sides with an exacto knife.

  • 1 - pkg of preserved sheet moss, approximately 3 oz's $3.20

  • 1 - pkg of plastic blue Robins eggs (or any that you prefer) $1.50 *these eggs were small, about an inch tall a piece, 12 total eggs, but you can use larger eggs or decopauged eggs, less eggs or more, etc 

  • White school craft glue which I already had around the house


Instructions:

Step one:
Simply take your styrofoam disk and press it firmly into the center of the wreath. No glue needed for this step, as the foam should fit tightly into the center. You can cut the foams diameter to fit, if it is too snug. I pressed the foam to where the disk sunk down a bit in the center of the wreath, from the top, giving it a bowl/nest  shape, and elevating the bottom. 

Step Two:
Lay your moss out on your workspace, breaking it into smaller clumps.  Pour craft glue onto a disposable plate. Dabbing the bottom of each piece of moss into glue, fill in the surface of the foam. I did a thin layer in the center, and more towards where the disk met the wreath, for a natural nest shape. Do not try to be perfectly even, nature is lumpy and bumpy. Let this dry completely (a few hours). 

Step Three:
In the center of your new large nest add your decorative eggs, and anything else that you might like to display. I did not use any glue for this part because I wanted to be able to change things up over the years. My 7 year old daughter decided a momma bird needed to be in the nest, so she grabbed the one off of my kitchen window (a big gold one). Not sure I love LOVE it but my daughter's enthusiasm was precious so it stays for now.

Tip: If you are concerned with a bit of shedding from all of the natural components (nature can be  a tad messy) BEFORE step two, you can hot glue a circle of dark brown felt to the bottom of your nest, first cutting the felt to fit the diameter of the wreath.  Hot glue on the outer edge of the felt, a nice even ring, and press (glue side down) all around the wreaths edge covering the wreath bottom and foam disk. Flip the wreath over and continue to step two. Choose a felt color that is close to the color of your wreath

HAPPY SPRING!

April